Monday, December 3, 2018

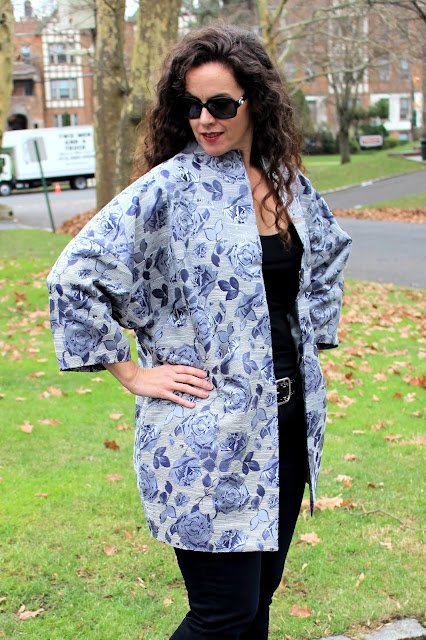
Metallic + Brocade = Sapporo Coat Frosting!

Oh wow how I love this coat!!


When I first laid eyes on the Sapporo Coat, my heart literally skipped a beat. So if you do not like superlatives, then you should just skip this post altogether.

Sapporo Coat by Papercut Patterns

This coat is one of those patterns that has some kind of special magic to it. The shape and proportions are sublime. The front seam lines also create visual shape. I am not generally into over-sized styles, but the Sapporo Coat is not shapeless. The cocoon shaping is intensely flattering on a lot of women.

When I first saw it I had thoughts of sewing in, even though it took a while. I found this rayon and metallic brocade at MetroTextiles and later bought silver kasha to line it with. 


The drafting is superb. Some of the wonderfully drafted features include a mitered hem and lining that goes together so simply and neatly that is seems like magic. 


Magic!

I did make a few changes. The coat only comes in three sizes. When I first muslined this coat, I tried a straight size S/M, which is the middle sized option and encompassed my measurements. It ended up enormous on top, but left me wanting more room in the hips. So, when sewing the actual coat, I sewed the XXS/XS above the waist, grading to the L/XL at the hips. I also trimmed away a generous inch through the underarm area - from the upper arm tapering to nothing around the waist. There was a lot of fabric under the arms. Lastly, I deepend the pocket bags by 1.5" so that my hands fit in them better.


I think the proportions are great!

The only other changes I made were little enhancements that I like doing and that add some functionality.


The Handmade plate doesn't have functionality. I just like it. 

I added a hanging chain between the facing and lining. I also added two large hand sewn hook-and-eyes to the inside of the front. This way, if I meet a strong gust of wind, my coat won't fly open.


 Anyway, I LOOOOOOOVE this coat. I may sew another for spring in a lighter fabric. For now, I will enjoy wearing this one through the holidays.


Saturday, November 3, 2018

Watson Bras: Sewing Frosting and Bra Sizing Questions

Hi Friends! Long time, no see. If you've been following along on Instagram you will have seen that I've been sewing, knitting and baking aplenty.

Recently, I've sewn some Watson Bras. I guess I've finally decided that my post-Taco bra size has stabilized and is here to stay. So, I'm willing to sew for it.

And what better time of year to sew some fabulous sleepwear than autumn, when the temperature is turning chilly and cuddling is in the forecast?

Sorry, but this is a bare a bra photo as I am willing to go...

I love sewing my own sleepwear. It's so comfy. I started wearing soft bras for sleep on the advice of my midwives after Taco's birth. My bust was heavy with milk and extra tissue, and having a little support at night was welcome. I still find it more comfortable to wear a soft bra to bed. And Watson is a perfect option - it is a wire-free bra that is meant to be made from stretch fabric.

I had already started working on these bras when Heather and Kelli announced their #SewFrosting challenge.  Back in 2013, when everyone decided they needed to sew more basics - "cake" - it really bummed me out, and so I declared it my own year of the Frosting Diet and set out some basic tenets for my projects. It transformed my sewing - made it more fun and purposeful. So, this challenge is a really good prompt for me to look back and take stock of where I am now.  I'm planning a bit of a retrospective, but we'll see if I get to it or not.

OK, back to my Watsons, which are definitely frosting. This was a really interesting sew for a number of reasons. Here we go...

First. I want to talk a bit about figuring out bra sizing for this pattern. I think it's important to start with the pattern's instructions since, as we all know, pattern sizing is different from RTW, and bra sizing is specific from brand to brand.

When I measured my full and high bust and calculated the difference, as the pattern instructed, it suggested a C cup. I was skeptical. Not only is my RTW size a DD (or E) (again, not a good way to determine sewing pattern size), but the pattern pieces also just looked too small for me. After some tissue fitting and a muslin, I ended up sewing a size F - one size larger than my RTW size. This actually is nearly the size I would get to if I had used my underbust measurement vs full bust.


Muslin 

In fact, whenever I've been directed to go by high bust vs full bust, it has not worked. Not at all. Even when I've been fit for bras by professionals, they always end up tsking when they measure my high vs full bust, then measuring my full bust vs underbust instead, saying something like "that's what I thought" and bringing me bras that basically fit. So my sense is that this is a way that my body may be unique, even though I don't seem to have a problem finding bras that fit. 

But I am curious to know: how do you generally measure for bra size? RTW or sewn or both? Does the high vs full method work for you? I am so skeptical based on my own size and shape.


As for the actual bra-making, it requires lots of pieces and parts, but in small quantities. It took more time to assemble fabrics, elastics, and findings than actually sewing, even taking into consideration that both of the stretch lace trims that I used were already in my stash.


For both of my versions, I used the tutorial for using scalloped lace trim for the bra cups on the Cloth Habit blog (here).

My first Watson, a black and hot pink lace version was infused with as much fail as I could pack into a project. I was sewing with a headache and did just about everything wrong. I sewed things in the wrong order, used all the elastics in the wrong places, and - for the bra band - I accidentally used an elastic that was too wide. Oy.


See that elastic? Yeah. Once it was turned to the inside, it was wider than the band. Gah.

However, it is a testament to this pattern and my experience with a seam ripper - a dubious trait to be sure - that I ended up with a very sweet bra nonetheless.


Not sure why this looks blue when it is black. 


Look at these nice details! 
The sew along on the blog really has some great info. I highly recommend it if you are new to bra making. (Here) If you have sewn swimwear before, it is very similar technique-wise.

My second effort went much more smoothly! This time I used a gold and black wide stretch lace trim.


Look at how fabulous!!!

For this version I used the long line cradle pattern pieces and - due to fabric limitations - made this bra somewhere in between the regular and long line styles.


I lined the cradle with denier tricot, which you can find at B&J fabrics in the NY Garment District for about $6yd.


This lace is very soft and comfortable. I will be sleeping fabulously in it.


And I have a few scraps left over that may ultimately become matching panties the next time I am in between projects and need a quick and fun sew.

I think this is a really a great and fun pattern as long as you keep two things in mind. First, this would not ever provide enough support for me for daily wear. I think if you are busty, plan on this being loungewear. Second, plan to sew a muslin or two. It will help you sort out sizing and also play with the techniques used for sewing the elastics and using the findings.

At the moment these two sleep bras are enough, but I am definitely feeling bitten by the bra sewing bug, so there may be more bras in my future. Because bras use such a small amount of fabric - even for a sizeable cup - they are a great place to splurge on really beautiful fabrics.

So,  tonight daylight savings ends in the US, and I will be enjoying that extra hour of sleep in my gold Watson and dreaming frosting covered dreams.  How about you? Are you in or out for the #sewingfrosting challenge?

Wednesday, August 1, 2018

Star Bellied Sneech Romper!

Oh hi! Summer is half over, and I'm just getting around to checking in.  It's been all kinds of busy fun here - the pool, the park, the zoo and backyard fun. 

Rompers are simply the best mode of summer dressing for little ones, aren't they?


One of my dear friends has a sweet little one year old. Last summer, when he was a newborn, I bought the Brindille & Twig Tank Romper pattern with the intention of sewing up some rompers. Then Taco gave up his nap and that ended my grand sewing ambitions.

So, when summer came around again, I pulled out the pattern anew to work on some one year old rompers.


The striped version has reverse applique stars on the front and the back...


As soon as I started working on it, Taco decided that the striped romper was for him. He was insistent. It was adorable. So, naturally, I had to make one for him. I gave him a choice of star color and placement - he chose turquoise and on the tummy -  and I was off and running.


My Star Bellied Sneech


Friends, when I was finished and gave it to him, he picked up the romper, kissed it several times and then insisted on wearing it immediately. This was the best thank you and compliment he could have given me.  And the romper has been worn and washed and worn again several times already.  I can't blame him; the fabric is so very soft and stretchy. I previously made pajamas out of it.


 As for the pattern, its very cute and went together nicely. I didn't love the instructions. They are written for those sewing without a serger, and so not all the steps make sense if you are using one. I really don't like instructions for bound necklines where you don't sew the shoulder seam until after you sew the binding on. I think it makes a bump. A few other parts also were sewn in a way that creates a little bit of unnecessary bulk, IMHO. So, I just went with my own preferred methods. However, a new sewist would definitely be able to construct this romper following the instructions. The design - with the front and back each cut in one piece rather than there being a center seam - is very easy.  It makes for a little bit of gathering/bunching at the crotch, which is not perfect, but for such a quick and easy sew is acceptable. One thing I like is that the pattern comes in sizes from newborn to 6T. I sewed the 2-3T for Taco. So, it is entirely possible that I will make this again for him next year. 

Lastly, I had the snaps installed by Star Snaps on 39th Street in the Garment District. I don't understand why you would go anywhere else for you snap, grommet and rivet needs. 


Nice work by Star Snaps

Since Taco is potty trained, I omitted the crotch snaps on his and instead made one of the shoulders a velcro closure so he could dress and undress himself. Snaps would have worked, too.The only problem with the romper is that the fabric - a rayon jersey knit - is exceedingly stretchy and not really holding its shape at the armscyes.

Anyway, this pattern makes a really cute little romper and is easy to sew, which is exactly what I want in children's clothes. I would definitely sew it again if I had an occasion to sew for little ones.


I hope you are having an equally fun and relaxing summer! I make no promises, but I hope to update you on all the other sewing I've done in the last many months.

Monday, May 21, 2018

Great Easy Jacket! Why do I Overlook New Look?


I have never had anything but success with New Look patterns. So you would think that I would sew more of them, and yet I often overlook New Look.


So I decided on a whim to sew the jacket from New Look 6013 with a remnant of fabric left after sewing a yet-to-be-blogged dress. The shawl collar jacket has princess seams, a "puffed" (pleated) shoulder and single button closure. Plus it is unlined. I was not particularly sold on the shoulder, but  I was open to giving it a try since the pattern and fabric was on hand and with it's princess seams and no lining seemed easy enough to fit and sew.


I cut a size 12 with very few changes; I added 2" of length to the hem and sleeve and was just able to eeek all the pieces out of my fabric. As I sewed I made a few more, albeit minor, changes. I took in the back at the princess seams and let the front out a bit at the bust. Honestly. I should have probably cut a smaller size for the back, done an FBA on the front, moving the apex down just a little (3/8" maybe), and lengthening above the waist in addition to at the hem.


What I didn't change at all was the sleeve/shoulder/armscye! It fit perfectly right out of the envelope. I'm not sure that's ever happened before. So, YAY for New Look.


Lightened so you can see detail

Since the jacket is unlined, I finishing the seams by serging the seam allowances and topstitching them down, a simple and neat finish. I finished the hem by using grosgrain ribbon from my stash as a binding and then hand stitching the hems invisibly.


The fabric is a brushed cotton suiting from Fabric Mart. It has a sueded sort of look and feel.

Since I finished sewing this jacket, I've worn it with it's matching dress as a suit, with trousers as an ensemble for work and, surprisingly often with jeans and a cami to go to the park, run errands or pick up Taco at school. Really, I'm finding it incredibly versatile. And - surprising to me - I really like the shoulders. I think it creates a lovely feminine silhouette.

I feel like I might need another one or two in my wardrobe once I refine the fit just a bit. Wouldn't it be great in a colored denim as a casual lightweight jacket? And, if you lined it, it would be perfect in a suiting. Or unlined in a cotton sateen. Really, this pattern is a hidden gem.


My school pick up uniform

Next up: the matching dress to this jacket and some new trousers and waistcoats  for work. 

Wednesday, May 16, 2018

Raspberry Trench Coat! Lekala Review


Finally a few pictures of my trench coat!


I began this trench waaaaay back around Thanksgiving.  For some unknown reason, I always start a major project at Thanksgiving thinking that I will be finished by Christmas. It never happens. I finished the final touches around mid-February and have been wearing this coat non-stop since the weather turned warmer and rainier.

The pattern for this cute trench is Lekala #4176, descriptively named "Raincoat." It has the features of a typical trench coat, but with a fun little extra at the back.


In this fabric - raspberry colored cotton/nylon water resistant sateen that I picked up at the Paron Fabric closing sale - there would be no mistaking this for menswear. However, I love feminine details added to more traditional, staid menswear styles, like the trench coat.

This was my first time sewing a Lekala pattern. If you are not familiar with the brand, they use software to create a custom pdf pattern using your measurements and any of their hundreds of designs. At less than $3 (seam allowances $.50 extra) trying Lekala was a low risk proposition. And I was curious to know how well a pattern made to my measurements would fit vs the usual number of changes that I would expect to make to a standard coat pattern (ie.: FBA, lengthening above and below the waist, narrow back, narrow neck, grading out at the hip, changes to the armscye and sleeve, and lengthening the sleeve).

The answer: the fit was pretty darned good "out of the envelope." The only changes that I made to my muslin was that I needed to raise the waist by about 1", narrow the back slightly at the princess seams and take in the waist at the side seams by maybe 1/4".  Other than that, the fit was pretty spot on.  The shoulder, armscye and sleeve, which are normally challenging areas for me all fit well with no changes. The bust, too, fits my figure well and it was great to not have to do all my usual changes which add time onto my projects. In the past I've been guilty of over fitting coats and jackets, which I think I avoided here by getting a pretty good fit out of the gate.


Now, I don't mean to imply that everything was perfect. There were a few issues with the pattern and instructions.

First, the instructions. I would give the Lekala instructions a solid rating of "if you sew BurdaStyle patterns, then you'll be ok." Better yet, if you regard them as a suggested order of construction rather than actual instructions, you'll be just fine. I would not, for example, try to sew the welt pockets using the instructions provided, but would use the ones that I am comfortable with from other projects or tutorials. The same goes for doing the lining and lapels. There are no pictures and there were some translation issues such as referring to decorative/fixing stitches (ie: basting stitches) and references to the back "yolk" piece. That said, from what I understand, Lekala has improved the instructions on their newer patterns. So my comments pertain to the older pattern instructions.


Smart money says use your own preferred welt instructions. 

Next, the pattern. The pattern pieces went together just fine. However, the real problem that would affect a less experienced sewist is that there were missing (undrafted?) or slightly off pattern pieces.  For example, there were facing pieces for the back neck and button/buttonhole bands down the front. However, there were not lining pieces that matched up with them. The back lining was drafted as all one piece from hem to collar rather than it being drafted to join with the facing. So, I had to alter that piece. And I had to draft a center front lining piece by using the main fabric center front piece and subtracting out the button band/facing.


Silk charmeuse for the lining from Chic Fabrics

Most important, the way that the center back piece is drafted, the fashion fabric does not extend underneath the storm flap (yoke), which is not attached to the back piece except at the shoulders and armscye - either it hangs free or you are supposed to stitch the yoke facing to the back piece, which just is not the best idea, I think. If you sewed the pattern as drafted but with the yoke hanging free, there would be nothing but the wrong side of the lining beneath the storm flap. So, I used the back lining piece to extend the back piece up to the collar. Again, this was easy for an experienced sewist, but it might present obstacles for someone less familiar with linings and coat/jacket construction.


I extended the center back pieces so that they would go up to the
collar instead of stopping at the storm flap


The only other sewing related things to say are:

  • I left off the straps and buckles on the sleeves. I didn't think the coat needed that detail  
  • In the future I would add a buckle or other hardware to the belt
  • Almost all of the seams have two rows of topstiching, done with two strands of regular thread (I loathe top stitching thread) in the top and one in the bobbin set to a longer stitch length
  • I added a pleat to the center back lining and a jump pleat to the lining at the hem
  • I outsourced the buttonholes to Johnathan Embroidery. 
  • I did not add a button and button hole to the stormflap


Pleat

I took my time sewing this coat little by little as I had so many colds and distractions over the winter. That said, I wasn't angling for perfection (read: please don't examine the aforementioned topstitching too closely).

My thoughts on Lekala are that I would and will sew from their patterns again. In fact, I've purchased a few more patterns to test, this time for dresses and blouses. I don't expect for the fit of any pattern - even one drafted to my measurements - to be perfect from the outset, but if I get a head start on some of my normal changes, it will be a big plus given that my sewing time is limited. So, I'm eager to see if the fit holds up with their more fitted garments. And by the way, Lekala has a large catalog of patterns for women - particularly dresses, shirts, skirts and jackets/coats, and seem to add new ones regularly with updated details that reflect current trends. I also like that you can create an account to save your custom measurements and add patterns to your wish list. I found their check out easy, the processing time very quick and the price of their patterns was rock bottom.

The shortcomings with my one experience with Lekala so far were as I mentioned above. So, my assessment is that Lekala is for those who have a good understanding of garment construction and don't solely rely on pattern instructions.

Anyway, I'm still really thrilled with my new trench and it's color, which I think suits me. I don't like tan and taupe shades on me, and a bright coat is the perfect antidote to a rainy day. This coat could be seen as emblematic of my sewing philosophy. A trench coat is a wardrobe need, but why would I sew a basic when I could truly make it fabulous. Frosting! Truly, I am not into sewing cake.

Here are some final pics.


Wednesday, April 11, 2018

Sheepish Little Sweater: Baaah-humbug, I Give Up

I think we are finally healthy and getting back on track.  I have tons to show you if only I could take a few pictures. So, if you are hanging in there with me, please keep on hanging.  And if you aren't following me on IG, you can find me there as cliophineas.

I suppose I have no one to blame but myself. Apparently, I didn't learn my lesson last spring when I knit Taco a beautiful rainbow sweater and he refused to wear it for weeks and weeks. To date, he has only worn it a handful of times.

I knit this uber adorable sheep sweater in the misplaced hopes that he would wear it as a holiday outfit. I reasoned that he is in a phase where he wants animals, dinos and other characters on his clothing.


But now that spring is here - even if the weather is not cooperating - I give up.  I think this sweater will just not be worn. Sigh.  So you will have to content yourself with photos not on Taco.

The pattern is Sheepish Little Sweater by Melissa Kemmerer.  It is knit up in Knit Pick's Mighty Stitch, which is a worsted weight, superwash acrylic/wool blend. It is a very soft yarn that feels lovely to the touch, and the colors are as bright and happy as could be. I have been using it for baby gifts recently.

This sweater was a good project for working on my stranded colorwork skills. You are never knitting with more than two colors at a time, which makes it pretty straight-forward. I'm still not 100% proficient, but I've made great strides. Look at these cute little sheep....


One of the nice little details is that the sheep pattern is continued on the sleeves. Super duper cute.


And here are my floats on the back.


The sweater is knit top down, in the round which makes it easy to knit. No seaming required.  The only change I made was to make it a bit longer than the size I picked suggested, since Taco is slim for his height. He tends to grow out of clothing length-wise before they fit width-wise.

Anyway, here are a few last shots.  I highly recommend


All that is left to say is Baaah!