Saturday, August 30, 2014

Project Bump Basics: Megan Nielsen Ruched Maternity Skirt

When I started contemplating sewing a maternity wardrobe and looking at some of the patterns and styles available, it seemed like slim pickings. The big four (plus Burda and KwikSew) offer a small number of basic styles, and most indy pattern companies don't have maternity patterns. There is nothing wrong with this per se - maternity is a small niche. But it sure is a time when you need new clothing asap and it seems like even the basics on offer missed the memo that the modern, urban, stylish mom-to-be prefers to wear something more like this:


Isabella Oliver - these viscose/elastane dresses cost $199 and $155

This basic silhouette can be dressed up with statement accessories, paired with a jacket for work or worn with sandals for more casual wear. Thankfully, indie pattern maker Megan Nielsen has sort of filled this niche with her ruched maternity skirt and wrap top. And Simplicity has actually licensed the wrap top and another pattern, which is available on their website.

So, as my very first maternity specific sew, I decided to try the ruched skirt.


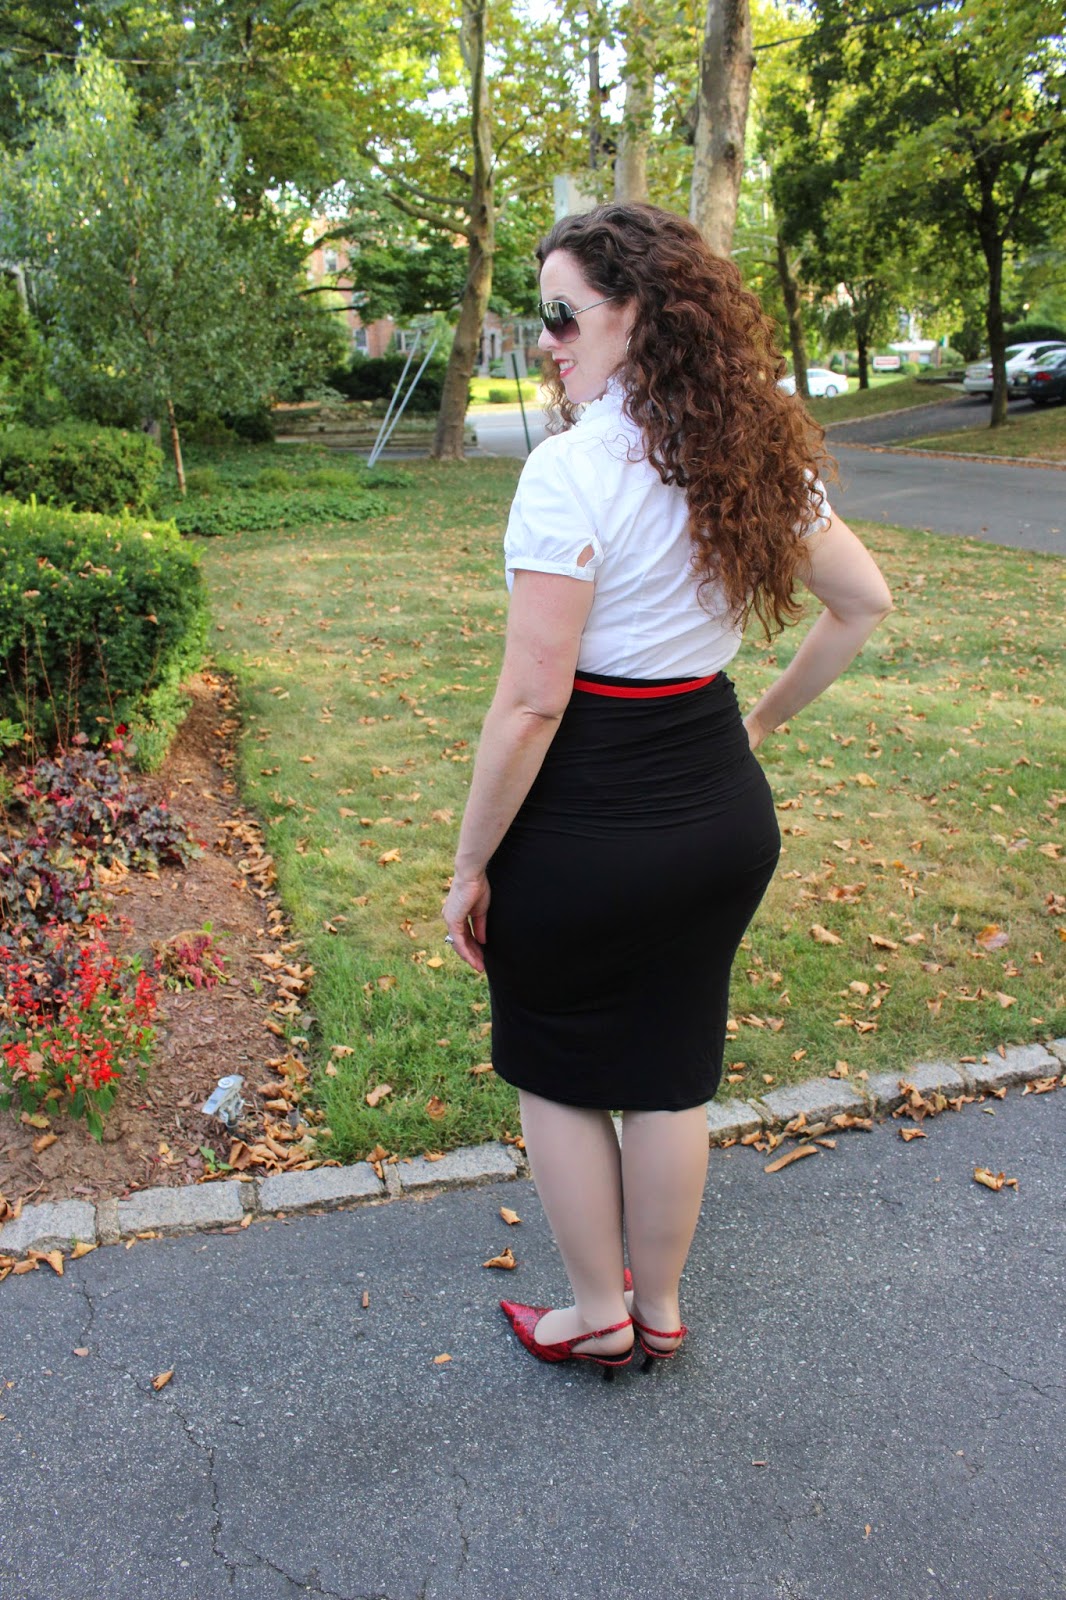
I think it looks great and it's been getting very regular wear. However, it really is the padded push up bra equivalent of maternity wear. Even though there's been some growth in the last week (yippee!!), it hasn't been huge. But this skirt accentuates every curve. So, perfect for showing off new and burgeoning curves.

However, things did not start out well (see here) when I sewed it up according to my pre-pregnancy measurements (which is what you are instructed to do). It was extremely close fitted - more than I was comfortable with across the hip/thigh, and so I let it out as much as possible. I still find it very fitted. Fortunately, I used a very stretchy rayon knit. In fact it's the same fabric from my stash that I used for my latest V1314 dress. So, despite the fact that it looks like it's fitting about as closely as possible, there is still enough stretch remaining that it should be wearable for a few more weeks.

My other quibble is that I don't love where the ruching stops.


It's pretty high on my hip/thigh, basically at crotch level. Obviously part of this is my height - I should have lengthened the ruching and added length to the skirt. However, there is no lengthen/ shorten line, and I guess I wasn't really thinking.  In future versions, I will extend the ruching at least a bit and lengthen that area. By the way, this is the below the knee length on me. It hits right at the top of my knee.


My last quibble is with side seams - when you fold down the waistband to create a casing for elastic, the side seams don't line up exactly. So you have to finess the waistband at both the seams to make it work.

Little complaints aside, this pattern gets a ton of things right.


First, it's in tune with the modern maternity vibe. It can be dressed up or down, and I love that it is over the belly instead of under, so you don't have to wear a big tent-like top with it, although you could. In these pictures, I'm wearing a non-pregnancy tuxedo-style blouse that I strategically unbuttoned at the bump.

Also, this pattern is easy and quick to sew - 2 pattern pieces and all there is to do is sew the seams, waist and hem and add the elastic. And that is the kind of sewing needed during pregnancy!! Last, it looks great and is very, very versatile.

One of my strategies for sewing a maternity wardrobe is to start with a few basic building blocks that I can play with.  This pattern is a winner and - with a few changes to address the close fit and ruching - has been my jumping off point for a mini collection of franken-dresses and top+skirt outfits. So, stay tuned to see how I've played with it this week.

Wednesday, August 27, 2014

Finished: Leaf Blanket

For those of you  regular readers who are already tired of prenancy posts, I've come up with a drinking game to make things more interesting. Every time you read "belly" take a drink. Same for baby and bump and any synonyms for pregnant including but not limited to: knocked up, preggers/preggo, expecting, with child, harboring a fugitive, in a family way, bun in the oven, having a baby, in the pudding club, gestating, baking, on the nest, in a delicate condition, in trouble, glowing and growing, up the duff, eating for two, etc. Drink twice if it's a new-to-you one or I combine terms, like "baby bump." Drain your drink if I say Raspberry. By now those of you already playing should be quite toasty. So, let's begin... 

I haven't posted a single knitting project since, oh, April. That's because as soon as I learned I was pregnant - and with an autumn baby no less! - I started knitting. I've knit so many baby gifts for others that I had a rather long short list of projects. But one of the baby blankets that I knew from the start that I wanted was Susan Anderson's Leaf Blanket.

Image From Spud & Chloe 

I think it's an adorable way to wrap up a tiny baby pea-in-the-pod style. And since a green leaf is gender neutral, it's ideal for Raspberry!


I knit this up in just a few days on size 15 needles in MadelineTosh A.S.A.P., which is 100% superwash merino wool in a super bulky weight. For non-knitters: superwash means that I can throw it in the washing machine without if felting instead of having to hand wash. In addition, I've read that some babies with very sensitive skin can't tolerate wool but that the superwash process, which strips or coats the scales from wool fibers (or a combo of both) can make is more gentle. We'll see!


In addition to being soft and cushy, what I like about the yarn is that the hand dyeing leaves it variegated, with patches of light and dark green. I think the colorway - Jade - is really rich looking.

The whole little blanket is meant to be wrapped around the baby like bunting and secured with a button.  I chose a lady bug button.


Lady Bug button!

Oh, right: we had help modeling the final blanket from Dragon the Hippo, who loves to be a part of whatever fun thing is happening. In his mischiefy way, Dragon is very into being a part of the baby excitement and was pleased to learn that his pot belly makes him a rather ideal model for baby things despite his small size. He was happy to dive in!


Snuggle-Hippo

Anyway, this pattern is super cute and also incredibly quick and easy to knit. A real win! 

Monday, August 25, 2014

Project Bump: Planning a Fun and Flattering Maternity Wardrobe

So, now that the news is out there, the fun begins. Let me tell you, I'm so glad I sew. Despite my grousing about my bump not being more obvious, my body is actually changing rapidly and has been for some time.

As I've already said, maternity RTW is a rather bleak scene. How bleak? Check out my "Dark Side of Maternity" Pinterest board for an inkling. I'm not against maternity RTW, but it has the same problems as normal RTW amplified by it's brief lifespan. Big price tags, poor fit and shoddy fabric and construction all seem to converge somewhere around the belly. So far the only RTW purchases I've made are a few cotton tank tops for the gym and some super stretchy camis to wear as basics/base layers. 

So what am I wearing these days aside from new swimmies? Good question. Well, I'm wearing a lot of non-maternity items that I sewed for myself, both before and during early pregnancy, including all of these.

Thank heavens I sew!!
Top row (l to r): V1314 Tracy Reese dress in black and tomato red , and Simplicity 3503 which I sewed in 2009
Middle: McCalls 6556 Fashion Star dress/tunic and 2 pairs of Ralph Pink Hareem pants in purple silk and black modal
Bottom: Vogue 8959 Ewok fur cape (ok, I'm not wearing this now since its summer, but I sewed it as sneaky maternity wear knowing I might need it this fall/winter), V8977 Oonapalloza dress and BurdaStyle 07/2011-124 Kimono. Trust me that the lounge wear is getting lots of use!

None of these were sewn with any maternity alterations except that the black Tracey Reese dress has some extra wiggle room. However, as my belly has started to grow, I've begun to contemplate a small wardrobe designed specifically to carry me through late-pregnancy and the first few months postpartum. I really want it to be fun, flattering and feel like me. Here are some considerations/challenges.

  • My legs: Early on I had plans to sew maternity trousers and alter RTW trousers with a maternity panel . However, a strong hereditary risk for varicose veins (thanks mom, grandma and grandma) meant that at the first sign of swollen, tired legs/veins I decided that medical grade compression hoisery was a must. I give myself one day a week off if my legs feel ok. But on a daily basis I am rockin' the granny pantyhose. Skirts and dresses rule. 
  • Limited time: My due date is in 13 weeks and in the last week my belly has noticeably grown. So, time is clearly of the essence. This is not my normal sewing style. 
  • My sewing style is my own worst enemy: Oh boy. How I hate sewing basics! And I love complicated technique and really good finishes. And I over fit things. Also, once I sew a pattern, I'm usually on to the next complicated thing. But for pregnancy, I need a compromise - sewing things that are easy, can be replicated, but won't feel like I'm sewing the same things over and over or wearing a boring and monotonous wardrobe. 
  • Limited sewing patterns: Maternity is a very small niche for pattern companies and I'm already picky about patterns. There aren't that many different styles to choose from. 
  • Work life vs Maternity Leave/Postpartum: I very much need to focus on things I can wear to work now, but include garments that I'll be happy to wear while on maternity leave and work for breast feeding. This is a challenge of both style and fit.  
  • Time of year: It's summer now, but will be almost winter by my due date. I'm hoping to transition garments through the seasons using layering - shrugs, tights, base layers, etc. 
Here are my assets:

  • I sew. Smartest skill to learn ever!!!
  • I have a serger. It has become the star of my sewing room in the last few months. 
  • I have lots of fabric! Yay fabric! Raw materials are a great thing!
  • I have mojo! I see the above challenges as fun obstacles to overcome and it's really got my mojo in overdrive. 
  • I'm open minded. I've already been experimenting with volume (wasn't I sneaky about that, folks?) and trying more shapes and styles, which has made it easier to see the potential in non-maternity patterns. Also, I'm feeling less nervous about sewing with prints and knits since this is a limited time project. 
Anyway, what advice do you have for me given my challenges??  If you've ever been pregnant, what were the indispensable items for you during and after pregnancy? Did you sew for yourself? I've already finished a few things and have begun a few more. So, next up, some fun garment reveals and sewing plans. 

Thursday, August 21, 2014

Bombshell Part 2: Where We Actually Talk about the Swimsuit

Thank you so much for all the comments on Monday's post. These are happy days for us!

But now let's talk about the swimsuit I actually sewed. As summer grew near and I was approaching the second trimester, I realized that "cute maternity swimsuit" is truly an oxymoron. But since I've started swimming for exercise instead of running, a new swimsuit was a must and I've been wanting to sew Closet Case Files' Bombshell Swimsuit for some time.

Maternity Bombshell Hack
Given the choice to add fabric to cover a baby bump or just work around the bump, I decided that less is more - bikini was the answer. In truth, I didn't really have to deviate from the pattern all that much to transform it. And there is nothing particularly "maternity" about it - anyone could alter the fit of the suit like this.  So, let's start with the top...


There is great info about DIY bikini tops as part of the Bombshell sew along, but I went my own way.  I chose to start with the bust pieces and straps from view B because I thought it would be a cinch to turn it into a halter style bikini top similar to one I already own, and I was right.

I started by cutting the cups/bust - plus self-fabric lining - and neck straps from the pattern pieces. Then I cut an underbust band 1/2 the length of my underbust circumference measurement minus 1" (for negative ease) and with a finished height of 2 1/2" after I serged the band with the wrong sides facing. I finished the bust pieces and attached them to the serged band according to the view B instructions.


Then I cut 2 long ties (32" each) that had a finished height of 3 1/2" after being sewn with the right sides together and turned. I gathered the unfinished ends just a little and joined them with a 1/2" seam to the front band at the side seams. Voila. Top done.

Because my body is changing and I wanted maximum adjust-ability with the fit, I like the ties at both the neck and back. Even in bras I like a snug fit at the band and straps, which I think make it more supportive. So I tie it pretty tight. It does change the look of the top a little compared to the pattern - it looks less ruched. But I think it suits me and flatters my burgeoning curves.

Here you can see how long the ties are.

Nice long ties!

Next, the bottom. Folks, this is the lowest cut bikini bottom I have ever worn, but for some reason being pregnant seems to make me feel like it's ok, since my goal was to wear it under my bump.  I started with the View C high waisted bottom, and cut just the lining pieces.  I basted the front and back together  and then tried on and marked (drawing with chalk) how high I wanted the bottoms to come on both front (below my bump) and back (I definitley wanted bum coverage!) I transferred these new measurements back to the pattern pieces and altered my cut pieces.

Lining pattern pieces cut into their new dimensions

One of the great bits of info included in the Bombshell instructions is the "ruching ratio". For every 1 inch of lining, there is 1.6 inches of shell to ruche. So once I had figured out how I wanted the bottoms to fit using the lining, it was easy to translate those changes into the new outer shell pattern pieces.


Shell pieces, shortened to correspond to the lining pieces. 
From there, I cut my fabric and followed the construction instructions for the swimsuit without any changes except that I shaped it just a bit at the side seams to mirror my shape. And that's it! One maternity bombshell bikini finished!

Front


Back


The only thing I will do differently next time is think about where to use my serger more carefully. Since I am sewing on such a short deadline and for a moving target, I've really been relying on my serger. It's perfect for getting the job done quickly. After attaching the ruched pieces to the lining with my serger, I then serged the center back seam together. This led to a bulky seam. It doesn't really affect the look of the garment, but I can feel it.

What I really like about this swimsuit is that the fit is very secure and flattering. The cut of the bottoms isn't skimpy - it fits one's cheeks in a secure and anatomical way. Neither is the top actually (no side boobage). And yet it manages to really flatter without looking frumpy! Holy cow. Other things I like about the pattern are the good instructions that are very well supplemented by the sew along. Even if you have never sewn swimwear, you will be sewing along in a confident way very quickly. Also, the sizing is realistic. I cut the sizes that corresponded to my measurements and they fit those measurements appropriately. Revolutionary!

Anyway, this is a real win and I foresee myself sewing it again. The top, I hope, will outlast my pregnancy and I think View C in it's original high waist form will be great as a post-partum swim suit bottom.

Monday, August 18, 2014

Two Bombshells, One Post!

As you know, I've been working on my Bombshell Swimsuit Bikini Hack. Here it is, with another bombshell for your viewing... um... whatever...


What? You didn't quite get that? I'm not surprised. How about the side view...


Yeah, I know, I know. That's the lamest 26-weeks-pregnant belly ever.


And that's with me really angling for the camera for maximal bump-age and to minimize the fact that I still have a distinct dent where my waist is/was. 

At first I held off announcing on the blog because of the increased risks associated with my age. But then, as the weeks ticked by and everything was going beautifully, I thought, well soon I won't be able to hide it. And so I waited.... 15 weeks...still early... 17 weeks... sometime soon...  19 weeks... any time now!... 23 weeks (at McCall's open house)...why aren't I showing?... 24 weeks... what the heck!?!?! For those not familiar with pregnancy, just google "26 weeks pregnant" or consider that 26 weeks is half a year, just two weeks away from the third trimester, and you'll understand why I have developed a severe case of belly envy. Apparently, my family "carries well" because of our height. In clothing it's really not obvious and I'm still having to tell people.

But enough silly vanity!  Let's talk about this happy bombshell today, and we'll leave the swimsuit for another day.

First off, how am I/how are we doing?
Great! Phin and I are thrilled, and our little Raspberry - whose gender will be a surprise - is totally normal and kicking up a storm. So far I've had the sort of easy pregnancy that gives people the wrong impression about how difficult it can be to grow a whole new person from scratch. It helps that I have a supportive partner in Phin, who is over the moon and looking forward to parenthood. We've built such a wonderful life together and feel like we have so much to give to a child. I'm due in late November, just days before Thanksgiving and a few weeks before our 10th anniversary.

Next, how is the herd taking the news?
At first, there was the sort of jubilation unseen in the Craft Lounge since Christmas morning. But when they realized that we were talking about a new little human and not a new knit herd member, the mood became pensive; babies have a habit of sucking and slobbering on their play things. But we explained that, because the herd was knit for adults and their poly-pellets are loose inside them and not sewn into a beanbag like I do for baby toys, they could be a choking hazard if a pellet got loose. Once the herd felt reassured that they will be given a safe hiding place on a high shelf away from the reach of grabby little fingers, the celebration returned.

Learning about babies (and Dinoshark)

They've thrown themselves into all things baby and are busy preparing gifts for the little one on the way. They are also thrilled that the herd will grow, with new stuffies especially for Raspberry. Stay tuned for posts.

Am I "nesting" yet?
If the nesting instinct can be measured in fabric and yarn purchases, then yes!  I will be sewing and knitting for the foreseeable future without any danger of running out of supplies.


The herd has baby gift plans.

Is that second trimester creative surge real?
In my case, absolutely. I have so many projects I've been holding back that the next few weeks are going to be a blogging bonanza as I try to share them all. I currently have a  maternity wardrobe project going - I have NEVER been more happy that I sew!!! Maternity RTW is a bleak and depressing scene and really isn't fitting my small bump. I also have his and hers diaper bags in the works and a plethora of knitting already done.

Wait. Does this mean that Clio & Phineas will become a mommy blog?
Oh dear, I really hope not!  Not that there is anything wrong with blogs that focus on young families and crafting for kids, but to be completely blunt, mother/daughter or father/son patterns creep me out in the same way that some people fear clowns, and I have no interest in posting baby puree recipes. But on the serious side, with such a supportive partner, I hope that I'll be able to continue to carve out space in my life for my creative pursuits and my needs. Obviously, a new little person will play into this. But my hope is that this blog will continue to be a place for my imagination, creativity and sense of humor, wherever that leads me. I hope you'll continue to follow along.

I think that's enough for today! But stay tuned because there's lots to show and tell.

Saturday, August 9, 2014

Cake and Ice Cream!

If you follow me on Instagram or Twitter (@cliophineas), you'll know that last night, I was utterly thwarted in my attempt to sew a Bombshell swimsuit. I've cleaned and organized the whole Craft Lounge but there's no sign of my mysteriously vanishing swimsuit elastic. The last time I mysteriously lost something, it turned up 2 years later out of nowhere. Egad.

Anyway, it's been a while since I've blogged about any baking or cooking projects. And since I spent most of last Saturday in the kitchen for Phin's birthday feast, I thought I should put these two tried and true recipes out there.

Phineas is not a big cake lover, and we had decided that root beer and creamsicle floats would be his birthday dessert. But since his family - um, all of them - decided to come for dinner at the last minute I thought we should have cake, too. So, I pulled out Patisserie at Home by Will Torrent, an Xmas gift from Phin.  


The Chocolate and Beer Cake is fast becoming a favorite thanks to a combination of ease and awesome results. It's a super moist loaf cake that, thanks to the addition of some dark chocolate, has a gooey fudgy bottom layer. All it really needs is a dusting of powdered sugar and maybe a scoop of vanilla ice cream. 


Chocolate Beer Cake

Don't be fooled by this cake's humble looks. It is a real winner - moist, tender and chocolaty. Thanks to it's moistness, this cake is just as good after a few days, although I doubt that it will last that long if you make it.

Chococolate and Beer Cake by Will Torrent 
(here for metric recipe, below for those who prefer cups and degrees)
1 stick salted butter
1/2c lager, like Stella Artois
1c self rising flour
1/3c cocoa powder
1/2tsp baking soda
2/3c sugar
1/3c milk
1 egg, beaten
1tsp vanilla
1 1/2oz dark chocolate broken into pieces
Preheat oven to 350 and grease loaf pan lined with parchment. Warm butter and beer in saucepan on low until butter melts. Set aside. Sift flour, cocoa and baking soda together. Add sugar, milk, egg, vanilla, chocolate and beer mixture. Stir to combine. Bake for 50 min until a skewer comes out clean. Cool for 5-10 min in pan before turning out.
Since we had ice cream and Orange Fanta leftover, Phin and I had post-work out creamsicle floats on Sunday afternoon. Homemade ice cream really is delicious. I used David Lebovitz' Philadelphia Style Vanilla recipe. Since it has no eggs, the hardest part is remembering to freeze the core of the ice cream machine a day in advance.


Day after ice cream floats.

You can find the recipe here. I like to churn the ice cream about 1-2 hours before I plan to use it so that it has a bit of time to firm up in the freezer. It's creamy and loaded with vanilla flavor. 

Have a great weekend - I hope there is something sweet involved!  We're off to a house warming pool party today.

Wednesday, August 6, 2014

Oonapalooza Dress: Better Late than Never!

Since Oona's not a stickler for rules or deadlines, here is my Oonapalooza dress - better late than never!


It's a dress length version of V8977, a Very Easy Vogue blouse pattern. This is one of those patterns that I initially dismissed as being rather mumsy, until I saw Erica B's dress length version. What is it they say about imitation?

The really fantastic detail of this dress is the peek-a-boo back.


This is a very different style for me as it's loose and flowy, but I've been going through a phase of experimenting with volume. There are a series of pleats at the center front neckline and side bust darts which softly shape the top. I think for my figure this soft shaping works better than unshaped, over-sized or boxy looks. Not that I think you'll see a major shift in my style, but - holy moly! - it's so easy to fit these loose and drapey garments compared to my normal fitted attire. No wonder it takes me forever to sew anything with all the fitting I do! This could have been done in a day.


I cut a straight size S (8-10) for this pattern since I normally start with a Vogue 10. Aside from lengthening this blouse into a dress (I lengthened at the 2 lengthen/shorten lines as well as the hem), the other changes I made were to omit the faux button band with buttons since I didn't think sitting on buttons would be comfy, and to shape the front hem. The back hem is curved, like a shirttail, but the front hem is drafted straight. I decided to mirror the curve of the back hem on the front. I like the effect, both with and without a belt.


The fabric I used was a gift from the Sewing Cave. It's some kind of woven poly that is heavy enough to not need lining. I usually lean toward natural fibers, but this fabric feels great on, was pretty easy to work with and is virtually wrinkle-proof. These photos were taken after a full day at work including round trip commute and lunchtime walk in the NYC summer heat, and it still looks like I just put it on.

The longer I sew, the more I find that marrying fabric to pattern and choosing the right set of techniques to work with a fabric's natural properties, rather than fighting them, really is the key to success. Since this fabric was ravel-prone, I finished all the seams as well as the hem allowance with my serger. One small challenge I had was that it's wrinkle resistance also means that it will not hold a crease and that imperfections won't "steam out." So, I used teeny tiny stitches (1.0 length) on the darts as I neared the point and really tried to sew right on the edge in order to minimize any bubbling at the tip.

The only moments of frustration that I experienced were when it came to the neck and arm hole facings. I know that half of you just rolled your eyes and said "well, duh!" at the mention of facings. I made the dress on a whim, and so wasn't really thinking too much about how I wanted to finish things. Since it's not lined, I just went with the pattern instructions and cut facings. It worked well enough for the neck/back with careful understitching and tacking.

The neckline behaves rather well! 

The arms were another story altogether. I ended up carefully removing the finished, understitched, pressed and tacked facings when they simply refused to behave - flipping out rather than staying to the inside. Instead, I finishing the armholes with a bit of twill tape from my stash with much better results, even though it means there is stitching visible on the outside of the garment. I think it looks fine.


Tape finished armhole and an inside view of the neckline facing. 

The end results: I really dig this dress even though it is so outside of my norm. I particularly like it unbelted, which is a shock. A big thanks to Carolyn, who gifted the fabric and issued the challenge that I think outside my comfort zone. Also, thanks to Oona, whose colorific love of prints inspired the Oonapalloza sew along. Maybe some day I will be brave enough to mix my prints. For now, just sewing something that isn't solid seems like a baby step forward for me.


Camera Update: So, a few people have asked about progress with my new camera. Honestly, a new camera has not done anything to encourage Phin's, um,  photography enthusiasm levels or improve my modeling ability. There is a growing collection of blurry pictures that would have been great had they been in focus, along with a depressing number of pictures taken while I am trying get a pebble out of my shoe or straighten a necklace, or am in the middle of saying something and making a crazy face. In the interest of both my blog and letting Phin off the hook, I think I will start experimenting with my borrowed tripod and timer. Sigh.


Pebble in my shoe!

Monday, August 4, 2014

Happy Bday Phin: Sewing for That Special Guy

Phin's birthday was on Saturday; happy birthday, my sweet!


Phineas on our Amsterdam Trip in May

I've been thinking about sewing for Phineas lately, but more broadly on sewing for one's significant other. It's something we all mean to do and want to do, but, um, rarely do. I'm no exception. It just seems like Phin and I can't get ourselves together when it comes to the details. I've offered shirts, but he can't seem to decide on fabric. I've asked about a messenger bag, but his fabric request was so specific (traffic cone orange ballistic nylon) that I haven't been able to find anything like it. In fact, it always seems to come down to a fabric impasse. I don't have this problem with other people in my life that I sew for.

That said, in the entire history of my sewing, the most worn garment that I've created is actually the pj bottoms that I made for Phin 4 years ago. No contest. They're worn, washed and then worn again. They replaced a pair of RTW pj's I had given him years before that. When the RTW ones started to get holes, I un-sewed them carefully and used the pieces to create a pattern, which I still have.

Phin's favorite pajama bottoms

I've noticed signs of wear and tear on these much worn pajama bottoms recently. So, for his birthday, I took all decision out of his hands and bought two different fabrics from Rosen & Chadick to make more for him. I'm sure that a box of fabric, thread and the pj pattern is one of the more unusual gifts Phin's ever received.


Fabric for Phin!

Rosen & Chadick is the place to go for spoiling the man in your life (read: real fabric splurge). These 100% imported cottons feel like silk. The blue is a heavier weight and will be winter pjs, and the green is summer weight with a lovely airy feel. Phineas seemed pretty thrilled for more custom pj's and has already asked for a few minor changes to the originals, like larger pocket openings. I can't wait to sew them up for him since everything I've ever made for him has become the most worn, most used things in his wardrobe. I think perhaps not giving him a choice in fabric was the way to go so that I could actually get going on the project.

Anyway, do you sew for the special person in your life? If not, what holds you back? Is it time or differences in opinion? A lack of agreement on fabric?  Purely selfish sewing? Or something else? I wonder if I have an easier time sewing for people that I don't live with because they have less input simply because of proximity. What do you think?


Dragon, Milkshake and Sriracha enjoying a nap

Later this week: My (late) Oonapalooza dress. Stay tuned!